Blender: Basic Materials and Textures in Cycles
|
What you will need:
|
When you first load Blender, the default render engine is loaded which in known as the Blender Render (Also as the Internal render engine). Its the render engine that has been in Blender since the beginning and is the first render engine that most users use learns first. However, since 2011, a new render engine has been added to Blender known as Cycles.
Cycles is known as being able to create more realistic results and so, it is unsurprising that a fair number of people want to use the new render engine instead of the older one. This tutorial is aimed at those who already know how to create materials and textures using the Blender Render and will teach you how the Cycles materials and textures work.
So let jump into Blender and get started.
Setting up to edit the Material

The first thing you want to do is make sure you are using the cycles render engine. Do this by clicking the box at the top that says "Blender Render" and select Cycles Render from the drop down list. Now you will be using the cycles render engine.
The first thing you need to know is that Cycles is a node based rendering system. This means that instead of using a series of options to click On or Off, you add the options you want in node form and connect them to each other.
Sounds confusing right?
I'll try explain a little further below.
Sounds confusing right?
I'll try explain a little further below.
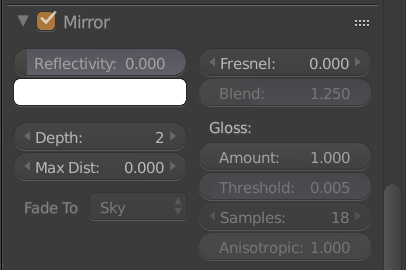
Blender Render Mirror Material
|
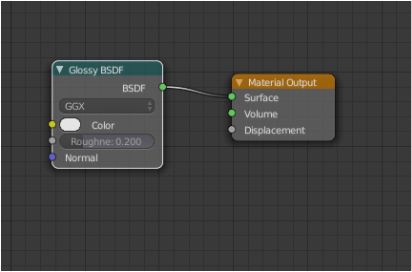
Cycles Glossy Node
|
In Blender Render you have an option on the list called Mirror. To use this you simply click the box a the top of the corner. In Cycles there is no long list of items to turn on. Instead you have a list of nodes to add to one another.
|
Okay lets go back to our scene. So far you have switched to the Cycles render engine from Blender Render.
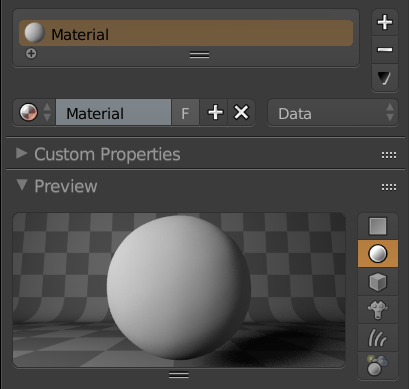
Now comes the fun stuff. If you had a material while using Blender Render, it will still appear in the materials list but it will look something like the image on the right. All you need to so is click that big button that says "Use Nodes". When adding a new material in Cycles, this will be the the defaults that your new material will take. And there you have it, your first Cycles material. |
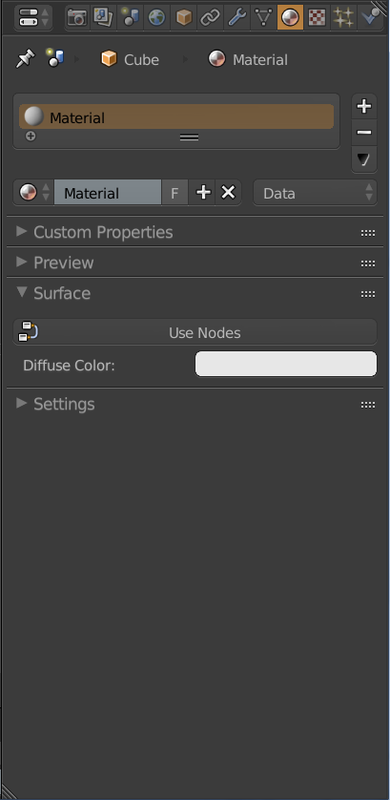
Before Clicking the Button
|
After Clicking the Button
|
|
So now your material is set to work in Cycles we can jump into editing the materials. We can do this 2 ways. One is with the list in the material editor just like when using Blender Render and the other way is to use the Node editor.
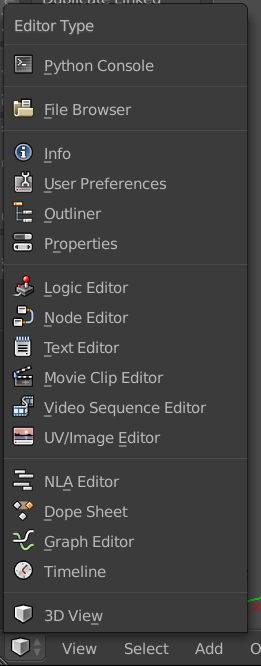
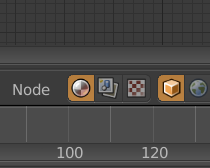
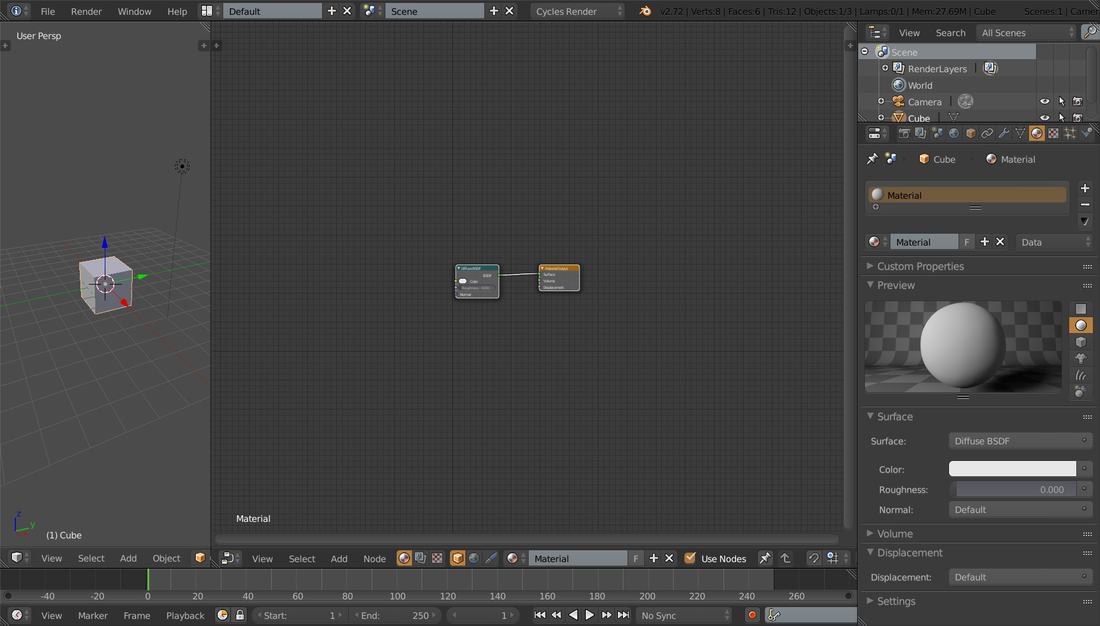
In this tutorial we will use the node editor as it shows what we are doing more clearly. To get into the node editor, we should first split out 3D view in 2. Do this by clicking and dragging the 3 sidways line at the top right corner of the viewport. This will split you view. Next, click on the small icon in the bottom left conner of the new view you just split. This will bring up a menu of the different editors you can use. Click on the node editor so we can work on the material nodes Finally, click the left icon of the group of 3 icons on the bottom of the viewport. This makes sure we are editing the material nodes and not the others. Also, make sure the cube is selected and not the world or pen in the other set of 3 icons next to the first group of 3. Now Blender should look something like the image below. |
|
Editing the Material
Now we are all set up to edit your material. Let go a head and look at the node system. This node system flows from left to right. That means that connections are made from the right side of one node to the left of another node. This is why the output node (shown right) only has connections on the left because it is that last node in any node tree.
There are 4 connect types that nodes use. They are colour coded using Green, Grey, Yellow, and Blue.
Green = Shader Value
Grey = Single/Alpha Value
Yellow = Colour Values
Blue = Vector/Normal/Coordinate Values
Each node will have one or more of these connection types.
NOTE - It is important that when connecting two nodes together, they use the same colour from Output to Input.
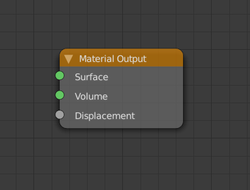
The first and most important node in the material node editor is the "Material Output" node. This is the node that connects the material to the object that it is linked to. Without this node, nothing will appear in you renders. As you can see, you have 3 output options. Surface, Volume, and Displacement. Surface node control how the surface of you mesh will look like while Volume controls volume data of your mesh. Displacement can be used to provide light displacement using the light on your mesh to make it appear bumpy but without altering the geometry of the mesh.
If you were to render your object with nothing connected to the output, you would get a black object as Blender wouldn't know how to colour your object.
So lets start connecting nodes! As this is a simple introduction into using Cycles materials, we will stick to using the surface output for the material.
There are 4 connect types that nodes use. They are colour coded using Green, Grey, Yellow, and Blue.
Green = Shader Value
Grey = Single/Alpha Value
Yellow = Colour Values
Blue = Vector/Normal/Coordinate Values
Each node will have one or more of these connection types.
NOTE - It is important that when connecting two nodes together, they use the same colour from Output to Input.
The first and most important node in the material node editor is the "Material Output" node. This is the node that connects the material to the object that it is linked to. Without this node, nothing will appear in you renders. As you can see, you have 3 output options. Surface, Volume, and Displacement. Surface node control how the surface of you mesh will look like while Volume controls volume data of your mesh. Displacement can be used to provide light displacement using the light on your mesh to make it appear bumpy but without altering the geometry of the mesh.
If you were to render your object with nothing connected to the output, you would get a black object as Blender wouldn't know how to colour your object.
So lets start connecting nodes! As this is a simple introduction into using Cycles materials, we will stick to using the surface output for the material.
|
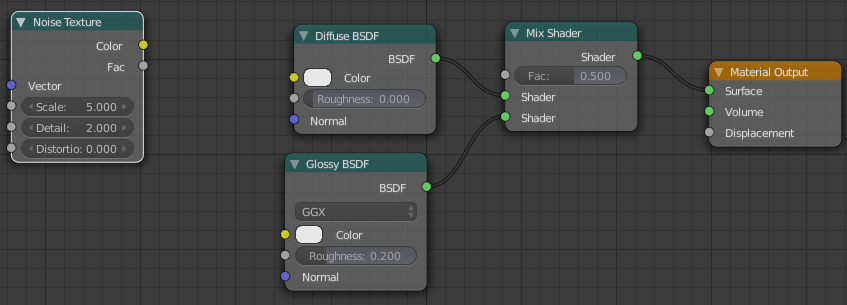
As we have added a material already, we should see two nodes connected together. The first node is the material output which we just talked about and the second is a Diffuse Shader.
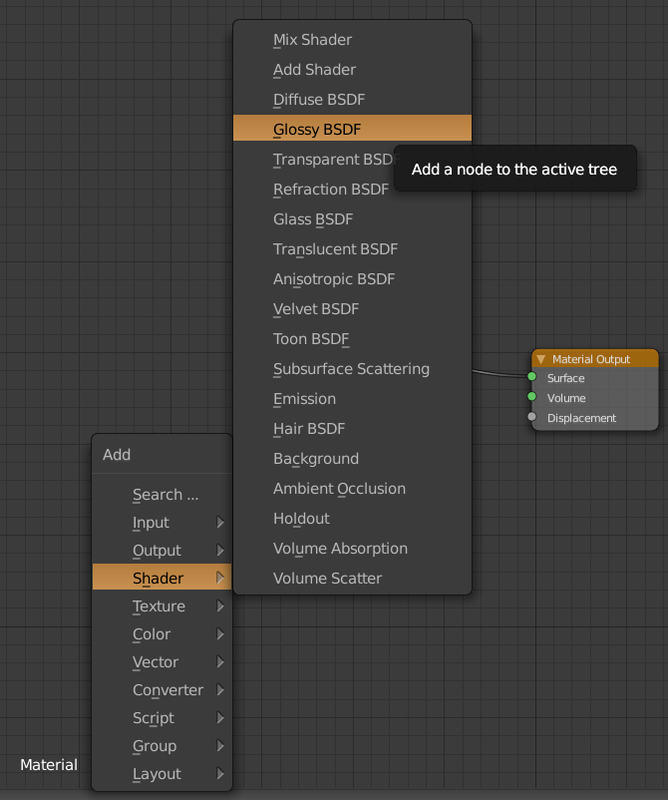
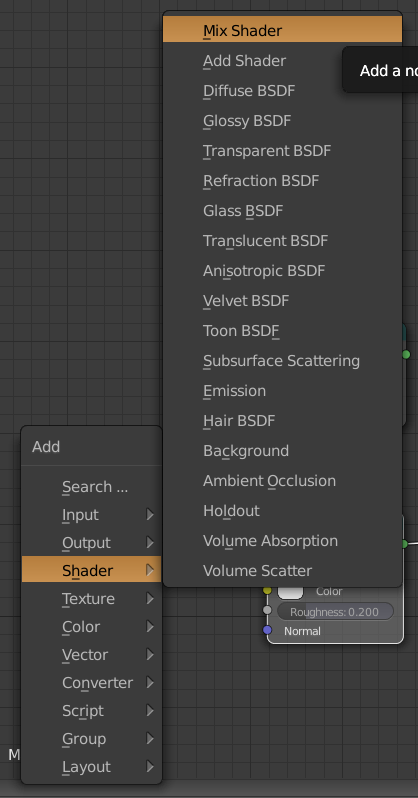
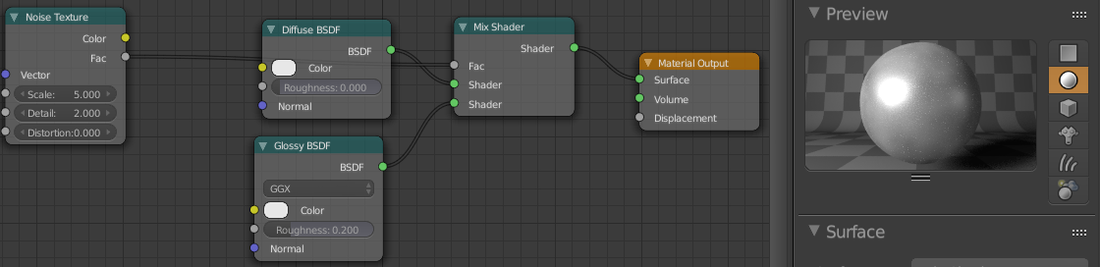
Shaders determine how the material reacts to light and how it is viewed by the camera. There are currently 17 different shaders available in Cycles not including the Add and Mix Shader which we will cover later on. Each of these shaders gives the material a different look and feel. The three most common shaders used in Cycles are a Diffuse Shader, Glossy Shader, and a Mix shader. Using a combination of these 3 can produce results from a reflective metal to a dull looking plastic. As these are the most commonly used ones, we will add them to our scene. While holding your cursor over the node editor, press Shift + A on your keyboard. This should bring up a list of category's that have various nodes in them. Move your mouse to the Shader option and another menu should pop out of the side. On this menu, select "Glossy". This will attach a Glossy node to your mouse. Position it below the Diffuse shader and left click your mouse to unattach the node from your mouse. The Glossy node replaces the Mirror and specular options in Blender Render. Adjusting the roughness value make change it from a sharp reflection to a really rough one. This node comes with a default setting of 0.2 roughness which is good for a specular material like plastic. So now we have two shaders that can can work with the surface output. Click and drag on the green dot of either the Glossy or Diffuse shader and drag it over to the Surface output. Back in the material editor, if you haven't already, click on preview to get a preview of your material as you work. Now as you switch each of the two shaders, watch as the preview changes. You should get one rough glossy effect and one shaded solid coloured one. But what if we wanted a mixture of the two to get a plastic material? To do this we need a shader that can combine them together. We will do this first with a Mix Shader. So again, press Shift + A , select Shader, but this time select Mix Shader. This should now attach a Mix Shader Node to your mouse. As before you can move your mouse around with the Node following it. Before deselecting it, hover the node over the wire that connects the Shader node to the Output Node until the wire Highlights. Then Left click. This should automatically attach the shader to the first Input of the Mix Shader and the Mix Shader to the Surface Material Output. 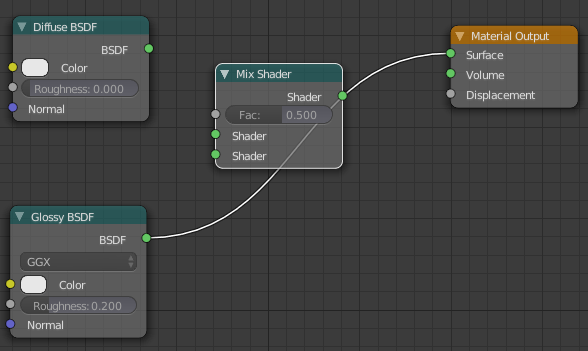
This will change your preview to a darker version of what it was before. This is because you are mixing a shader with nothing which Blender reads as Black so you get a mixture of the two.
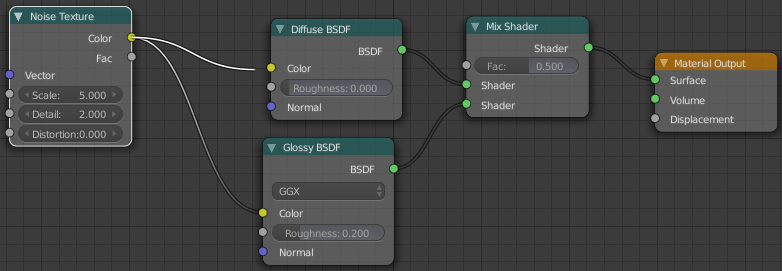
To get a mixture of the two shaders, connect the other shaders Green output to the Mix Shaders other Green Input. Remember, Green to Green. Now you should get something like this. |
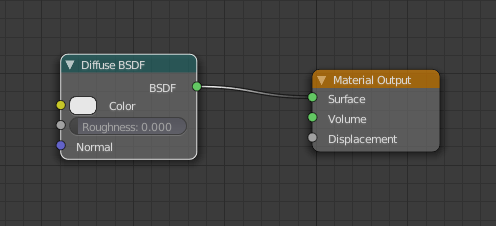
Diffuse Shader Connected to Material Output
|
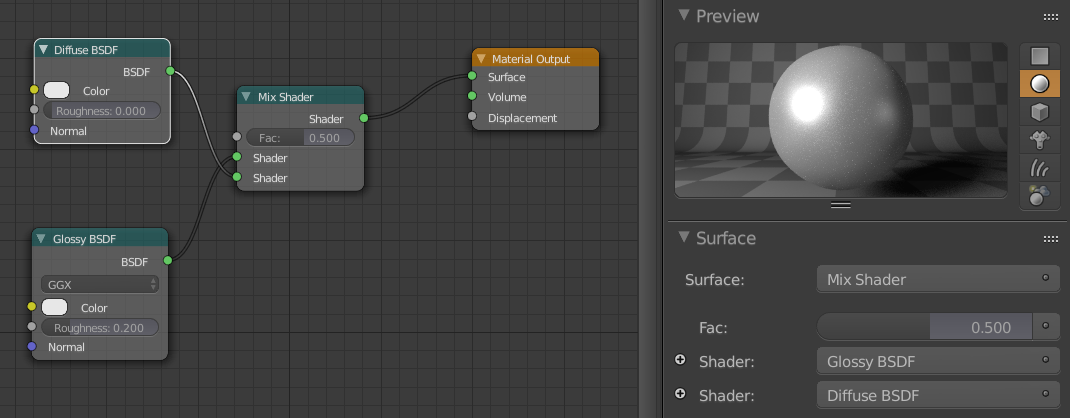
You can adjust how much of one shader is more prominent than the other by using the Fac (stands for Factor) Slider on the Mix Shader. Moving the slider all the way to one side will mean that the shader associated with that side of the factor, will take over the material completely.
The other way of mixing two shaders is by using the Add Shader. This shader works similarly to the Mix Shader but instead of having a Mix factor, it add 1 on top of another. This node is used less often as most things in real life are a mixture of what we call shaders. There are exceptions to this like some leafs of trees were a translucent shader is needed.
I encourage you to try other Shader nodes which are available from the same menu to see what you can get from each one and then try combining a few using the Mix and Add Shader to see what sort of results. Remember, Shift + A opens the menu.
Texturing Materials in Cycles
Texturing in Cycles is very different than in Blender Render. In Blender Render you have a separate section for texturing you material. In Cycles however, you texture the material directly onto the material in the node editor. While this is different concept than the one used in Blender Render, it has he potential to be much more powerful and once you get the hang of it, easier to use.
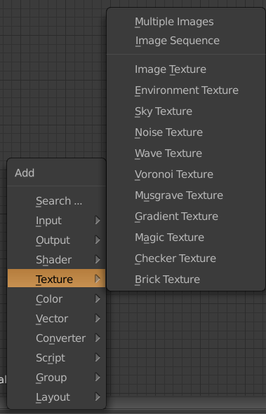
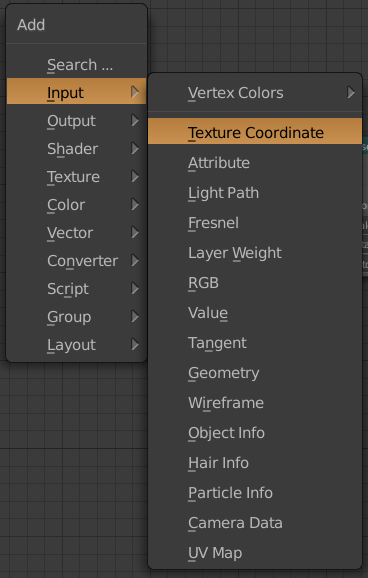
The best way to get to know this system is to dive right in so lets get down to adding a texture to our cycles material. First lets have a look at the different textures that Cycles supports. Hit Shift + A on your keyboard to bring up the Add menu and navigate to "texture" tab to bring up the list of texture nodes.
The best way to get to know this system is to dive right in so lets get down to adding a texture to our cycles material. First lets have a look at the different textures that Cycles supports. Hit Shift + A on your keyboard to bring up the Add menu and navigate to "texture" tab to bring up the list of texture nodes.
|
The first thing you might notice when comparing the list of Cycles textures against Blender Renders textures is that the list is shorter.
The reason for this is that some of the Blender Render textures can be replicated using other textures or have been out-dated and removed. Other textures have actually been renamed and so would work differently that what you expect. A good example of this is the Noise Node in Cycles. The name suggests that it is the Noise texture from Blender Render, however, the Noise Node is actually the Cloud texture renamed. The actual Noise texture from Blender Render was one of those out-dated and removed. |
Cycles Textures
|
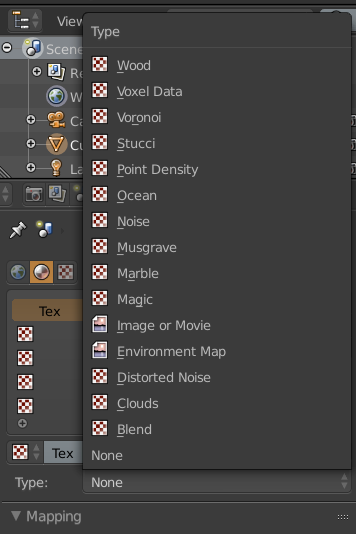
Blender Render Textures
|
Here is a short list of some of the textures that were renamed for Cycles.
- Cloud -> Noise
- Wood -> Wave
- Blend -> Gradient
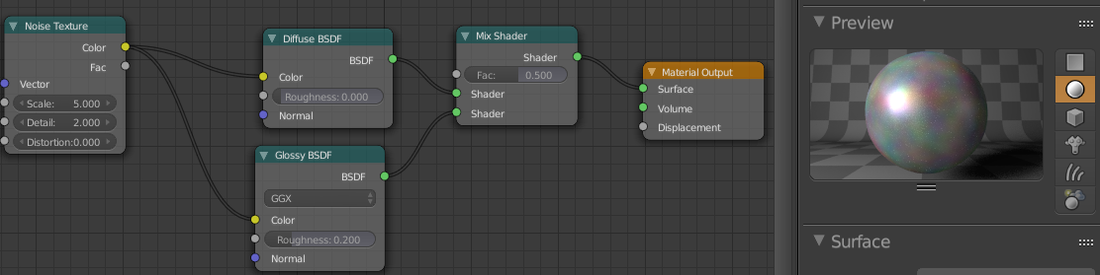
We can see the Texture node has two outputs on the right hand side of it. Most of the texture nodes have the same outputs available. At the moment the mode is unconnected to the mater. To add the node to the material click and drag the yellow Color output to the color Input of the Diffuse Shader and again but this time to the Color input of the Glossy Shader . Now look over at your material preview to see how the view has changed.
|
The reason to connecting the texture to both shaders is for you to be able to see the effects of the texture more easily in the preview port. It is NOT necessary for you to connect it to all shaders in the future.
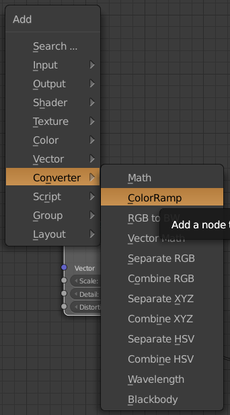
To change the color of the color output, we need to convert it. We will do this with a ColorRamp node. This node does the same as the color ramp in Blender Render but here we have to add it the right place. The ColorRamp node is in the Add menu (SHift+A) under the Converter tab. Before we connect it on chain, we should disconnect the texture node from the shaders. To do this, simply click and drag on the wire where it enters the Shader until there is a gap, then release you mouse button. Do this for both wires going from the texture into the shader. This same technique can be used for any wires in the node editor. |
|
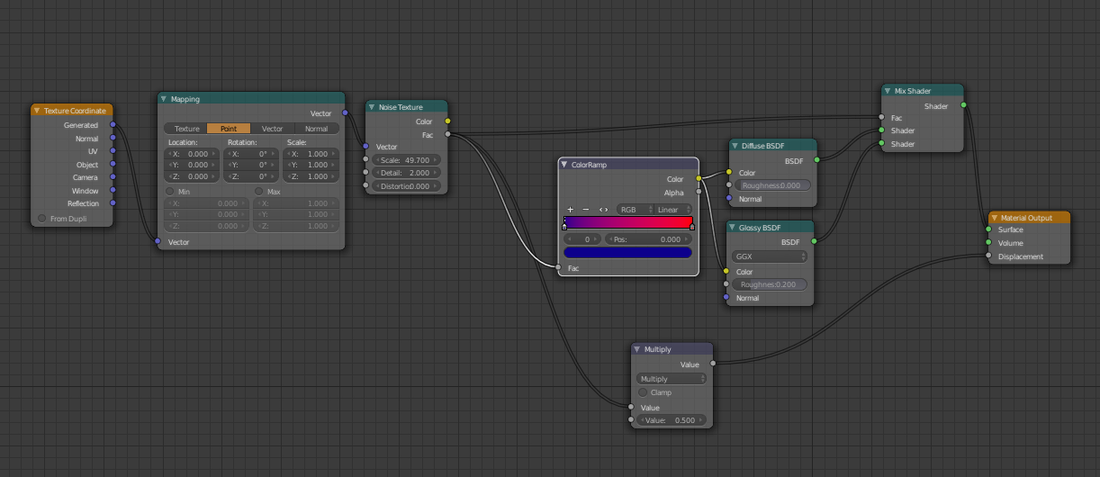
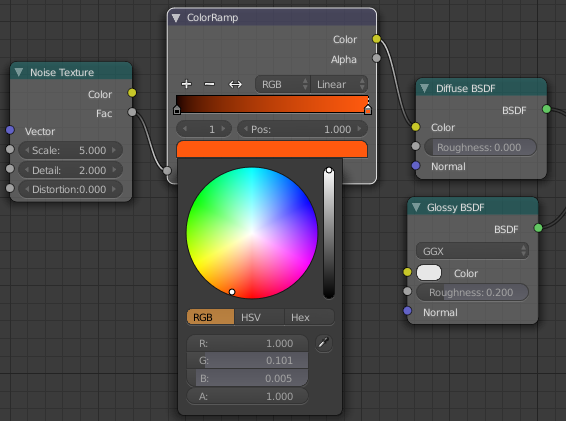
Now lets connect the ColorRamp node into the sequence. To this by dragging the Factor output of the Texture into the Factor Input of the ColorRamp, and then Connect the Color output of the ColorRamp to the Color input of the Diffuse Shader. This will control the colour of the texture that you use. You can change the colour of the texture by clicking on the markers along the ramp and changing the colour of the marker.
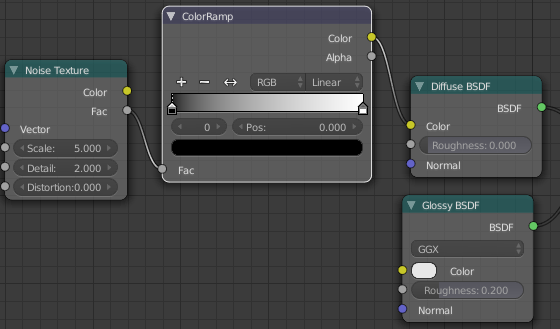
You can change the colour of the texture by clicking on the markers along the ramp and changing the colour of the marker.
The Color output is not the only way a texture can effect a material. Another way is to use the Factor output to effect the Factor of the Mix shader. To do this, click and drag the Factor output of the texture and drag it over the into the Factor Input of the Mix node. This will make the Mix shader use the Factor of the Texture to mix the two shaders.
This can be useful for mixing two different shaders together for various reasons like adding in rust to an object or varying the roughness of a reflective object.
So now we have a texture we can use to effect a material, but sometimes we need to change the way the texture is mapped onto an object. To do this, we need 2 more nodes.
So now we have a texture we can use to effect a material, but sometimes we need to change the way the texture is mapped onto an object. To do this, we need 2 more nodes.
|
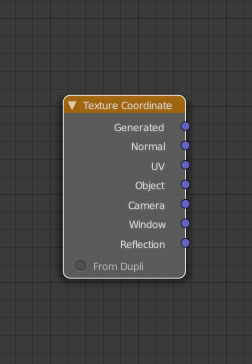
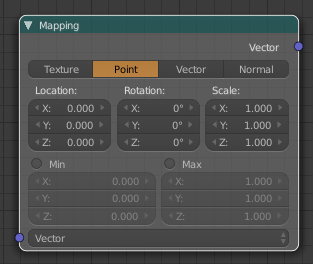
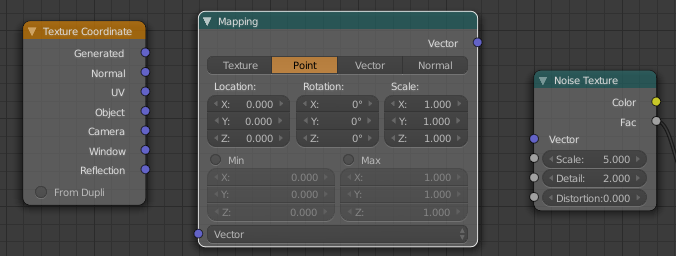
The first node we need is called "Texture Coordinate". Simply put, it gives you a range of mapping options like in Blender Render for which the coordinates of of the texture can use.
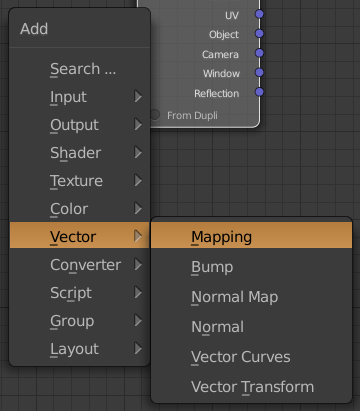
This node CAN'T be used on its own however, it needs another node in the sequence. The other node is called a Mapping node. It is located under Vector in the Add menu (Shift+A). The nodes should be alligned so the Texture Coordinate to be at the left side, the Texture node itself on the Right, and the Mapping node in the middle. |
|
|
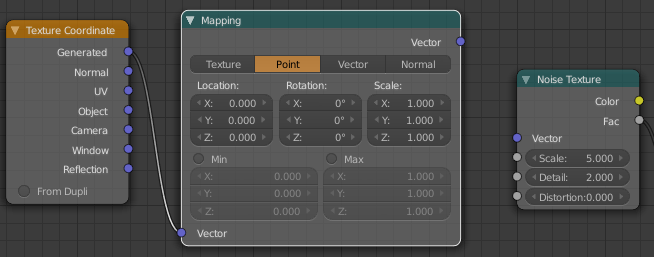
So first we need the coordinates we are going to use. This will depend on the object you are texturing but as this is an example, I am going to use Generated. These mapping coordinates will be automatically generated by Blender for you. To choose this type of Coordinate, click and drag the blue circle next to the name, down to the Vector input of the Mapping node.
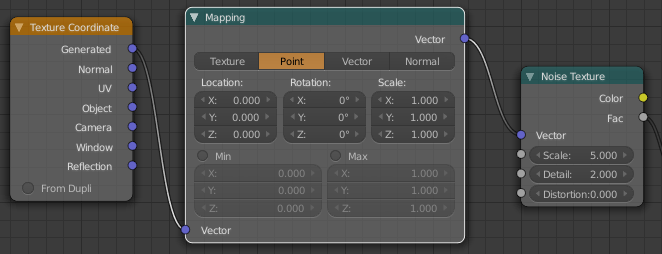
So now those coordinates will be mapped using the node so now we need to make the texture use this node. Do this by clicking and dragging the Vector Output of the Mapping node to the Vector Input of the Texture node. Remember, Blue to Blue.
So now we can add textures to our materials and map them. This is just an introduction into material in Cycles but it should provide you with the basics to create you own materials and build upon them.
General Tips and Tricks
|
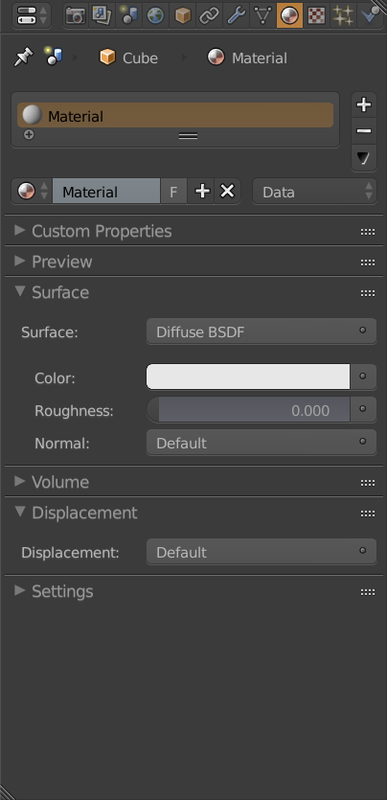
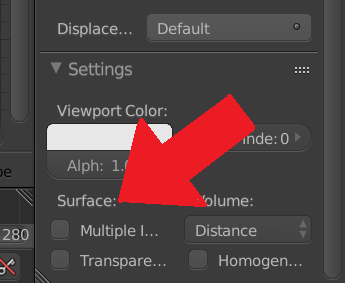
My first tip is to uncheck two little boxes in your material settings. Doing this will help reduce the number of fireflys that appear in your renders. These setting are back in the material editor (not the node editor) down the bottom in a collapsible menu.
There are instances that you will want these checked like when using a material as a light source with the emitter node (Check Multiple Importance Samples) or a transparent shader (Check Transparent Shadows). While we are down in the settings, you can change the colour of the material you are using in the viewport by changing the colour in these settings. The default for any new material is white and it can become confusing which material you are working with if you do not change this colour. This does not effect the colour of your renders, only the viewport. |
|
When using an image to create a Normal Map, make sure you use Non-Color Data instead of Color. This will make sure you get the best possible result from your normal texture.
